Posted by Kristen Nelson on 12th Jun 2023
How to Finish the Seams as You Sew
If you are somewhat new to sewing, you may have questions about how to "finish" your seams. We recommend that you do finish all your seams as you sew them, unless otherwise specified in the pattern. Finishing your seams means that you are applying a technique to the raw edges so they will be more sturdy. We don't tell you exactly how to do it though, because a lot of that is entirely your preference. There are various techniques out there, and the one you choose will probably depend on the equipment and supplies you have available. I thought it would be helpful to show you the six most common ones we see today, along with how to do them and their pros and cons.
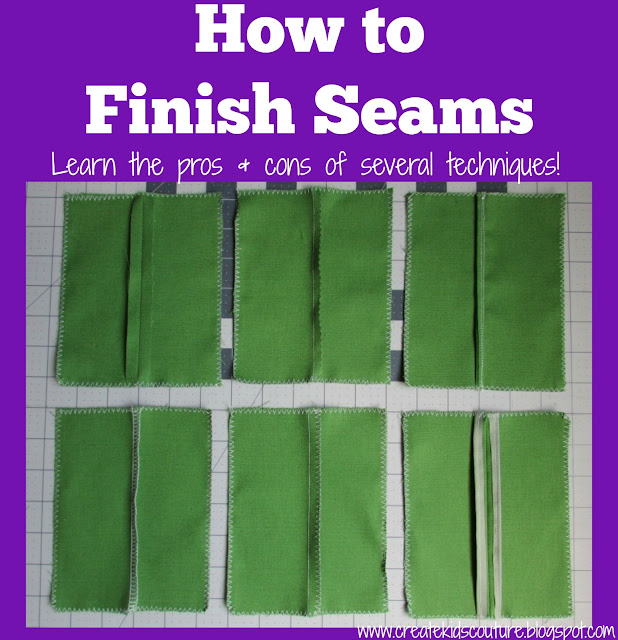
Take a look at the image above. Which one looks best to you? That will have a lot to do with which technique you choose! I think the inside of our clothes should look just as professional as the outside. And generally the better they look, the more sturdy they will be after lots of wears and washes! If we're going to put all that love into a project, we want it to last!
For today's tutorial I thought it would be fun to do a little experiment. After showing you all the techniques, I am going to toss these samples into the laundry and see how they all come out!
First of all, I took the sample pieces and sewed a regular seam connecting two of them together. I made all six sets exactly the same, and their "right" sides all look like the photo above. From now on you will be looking at the "wrong" side of the fabric, where the seams are.
**Please note as I go through the methods below that I am starting with my least favorite first, and saving the best (according to me) for last!**
Method #1: Use an iron to press the seams open. This is the way my mom taught me back in the day, and it was very common for home sewing. It's not much of a finish on the actual raw edges, but it does keep the seams crisp during construction. (I might even say that this is not a finished edge at all, but it did show your seams a little love.) (And no offense to my mom either.) She is awesome and made amazing clothes for her five kids!
Pros: Fast, needs only and iron
Cons: Edges fray easily during wear and washing
Method #2: Use pinking shears to trim the raw edges. I don't have a lot of positive things to say about this method. The idea is that "pinking" the edges takes off the outer threads that may become loose, as well as the excess seam that a serger would be cutting off. It does accomplish both of these things, but it still leaves your edges pretty raw. (I do use my pinking shears on curves inside lined bodices occasionally, but only when those seams will be enclosed.)
Pros: Fast, better than nothing
Cons: Edges fray easily during wear and washing
Method #3: Apply seam tape or binding to the raw edges. (Also called "Hong Kong" finish.) You can find a variety of seam tapes and bindings for this purpose. The package will generally have instructions for how to apply it, whether it is a no-fold, single-fold, double fold, etc. In the example above I followed the instructions on my package to sew one edge of the tape on one side of the seam, then pressed the other edge around and sewed it in place. You do it to both sides and it is not difficult, but it does take some time. If you would like to see an in-depth tutorial for applying a double-fold tape to your seams, you can click here for that, and it even has a free project to practice on. Remember that even though the seam looks like the above picture on the underside of the garment, the outside still looks exactly the same as if you had used other methods.
Pros: Professional finish, seams are fully enclosed
Cons: Takes a lot longer, requires seam tape/binding, final seams are a bit more bulky
Method #4: Use French Seams for construction. This technique is a favorite for many people because it fully encloses every seam within itself. It takes some time but looks really pretty on the under-side. There are a few different ways to use French Seams, and the one I showed above is how it looks when I am keeping my 3/8" seam allowance. The basic idea is this: I put the fabric wrong sides together, sewed using a 1/8" seam allowance. Then I flipped the fabric around so its wrong side out, pressed the seam to make a nice crease, then sewed that using 1/4" seam allowance. My final seam above is 1/4" wide and has no raw edges showing. Then I topstitched it to the side because I don't like the bulk. That was a lot to describe all at once, but no worries. We have a full tutorial AND video for you, if you're serious about learning to use French Seams. Click here for that in-depth tutorial! It shows how to use my seam allowance method, as well as a more traditional way that would require you to adapt the seam allowances of your pattern pieces.
Pros: Professional finish with no special equipment or notions, very sturdy seams
Cons: Takes longer, may require adjusting your seam allowances and/or pattern steps, topstitching (if you do it) shows on the outside of the garment along every seam
Method #5: Zigzag the raw edges. To do this, you will simply set your sewing machine to its zigzag stitch and sew along the raw edges. I am going to cautiously say that this is my second favorite method for finishing edges. It's what I use on my own kids' clothes when my serger is not available. It is not as professional as some other methods but I would say it's the most bang for your buck, if you don't have a buck. (Ha.)
Pros: Quick and easy, seals raw edges fairly well, uses only the sewing machine
Cons: Not as professional as a serger, edges are still slightly exposed
Method #6: Serge the raw edges with a serger or overlock machine. Most of the store-bought clothes I see use this method. A serger is not required for sewing quality clothes, but it does make a big difference! I think it's worth the investment when you're ready. There are so many sergers available, so I will just say that you should follow the instructions that come with your serger. Don't be afraid to play around with it on scraps; it's not scary at all. We do have a bunch of helpful serging tutorials on our blog, so click here if you want to get started with those. Important note: I always sew my seams with a sewing machine before serging the raw edges.
Pros: Professional, quick and easy, excellent protection for raw edges, trims seams as you serge
Cons: Requires the purchase of a serger
Alright, that's all the techniques we're covering today!
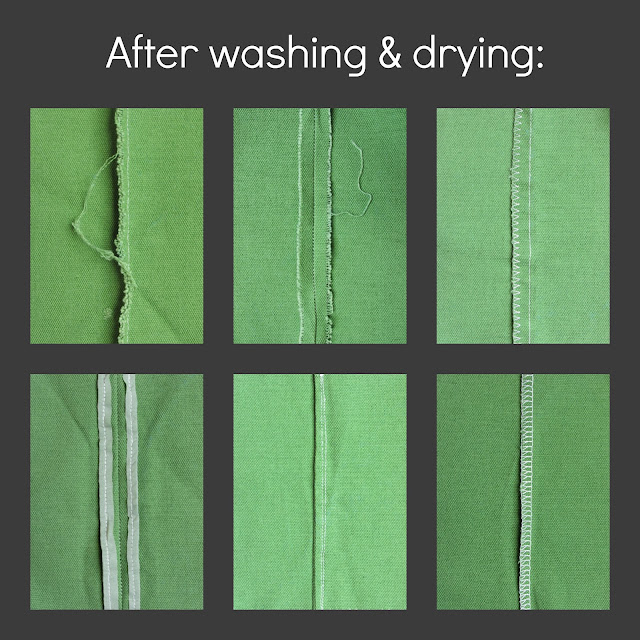
Are you ready for the results of my little experiment? I threw all six fabric samples into the wash with a regular load of laundry. Washed on cold, regular cycle, and then dried on warm, regular cycle. When I pulled them out, they were kind of balled up so I did iron them before taking pics, but I was careful not to remove any threads etc. Here they are!
Ooh, interesting! Can you tell which ones are which? Notice that the top left two (pinked, pressed) aren't looking so great. The threads can be trimmed and it's not the end of the world, but this was just one washing so imagine what can happen over time! The top right picture was the zigzag and it held up really well (no loose threads), although not quite as well as the serged edge below it. (Still my favorite!) The french seam (center bottom) doesn't look any different at all so it's clearly a sturdy finish. But that last one on the bottom left -- I do have to say that it was SUCH a pain to iron. It was all bulky and twisted funny and did not want to lay flat again. Grrr. It may have been the quality of my seam tape or fabric, I don't know, but it moved this technique down my happy list a little bit more. (I like using trim tapes around sleeve trims and bibs, etc, but I can't imagine doing it on all my seams on the inside. Boo.)
So there you go! It is entirely up to you how you choose to finish your seams. If you are sewing for your family, you can probably get away with the "lesser" finishes. But if you're sewing for a boutique or gifts, I strongly recommend a serger or other professional method.
Remember, though, that whichever method you choose, it is important to finish each seam as you go, before moving on to the next step of construction. Patterns don't always tell you to finish your seams (it is more of a sewing technique than a "step"), but it is highly recommended to do so unless otherwise instructed. All clear? If you have any questions, be sure to email or ask in our pattern group on Facebook! We are always happy to help out.
Let's Create! ~ Kristen


