Posted by Kristen on 5th Aug 2024
"Mommy & Me" Matching Aprons
It's the 12th Day of Christmas at CKC and I am super excited about today's free pattern! Whenever I need to make an apron I usually wing it, because I don't especially like any of the zillion free apron patterns that are out there. So yesterday I actually sat down and made my design into a pattern. Woohoo! How does it sound if we give you four sizes of a Mommy & Me apron?!
Aren't they super cute? I made this set for a friend but I kind of wish I was keeping it for myself. I might need to make myself a Christmas present this year!
Like I said, today's FREE apron pattern comes in four sizes, perfect for Mommy & Me sets: Women, Tween, Medium Child, and Small Child. (I think the dividing point between the Small and Medium child is about 4T.)
These are perfect for gifts and for every day play in the kitchen. Let's get started!
Fabric Requirements:
Adult size:
7/8 yard main fabric
1/2 yard ruffle fabric
3/8 yard ties fabric
Tween size:
7/8 yard main fabric
1/2 yard ruffle fabric
3/8 yard ties fabric
Medium Child:
2/3 yard main fabric
1/2 yard ruffle fabric
3/8 yard ties fabric
Small Child:
2/3 yard main fabric
1/2 yard ruffle fabric
3/8 yard ties fabric
Cutting Out Pieces:
Print the pieces, tape them together by overlapping lines, and cut out the larger size you're making first. Lay the pattern piece on the fold and cut out the fabric. Then cut the pattern piece down to the smaller size apron you're making and use it cut out the fabric.
After you have the main portion of your aprons cut out, then you will use a ruler and fabric scissors, or rotary cutter and mat, to cut out the following rectangles for the remaining pieces. If you haven't done this before, you might find this blog post and this blog post helpful. It really saves a lot on cutting time by using this method! I also recommend that you label the back of each piece with a pencil so you don't get them mixed up! Here are the pieces you will need:
Adult size:
Ruffles: Cut 4 pieces that are each 4" x 33"
Sash Center: Cut 1 piece that is 3" x 26"
Sash Ties: Cut 2 pieces that are each 3" x 26"
Neck Ties: Cut 2 pieces that are each 3" x 21"
Tween size:
Ruffles: Cut 4 pieces that are each 4" x 30"
Sash Center: Cut 1 piece that is 3" x 24"
Sash Ties: Cut 2 pieces that are each 3" x 25"
Neck Ties: Cut 2 pieces that are each 3" x 21"
Medium Child size:
Ruffles: Cut 4 pieces that are each 4" x 25"
Sash Center: Cut 1 piece that is 3" x 22"
Sash Ties: Cut 2 pieces that are each 3" x 24"
Neck Ties: Cut 2 pieces that are each 3" x 21"
Small Child size:
Ruffles: Cut 4 pieces that are each 4" x 20"
Sash Center: Cut 1 piece that is 3" x 20"
Sash Ties: Cut 2 pieces that are each 3" x 22"
Neck Ties: Cut 2 pieces that are each 3" x 21"
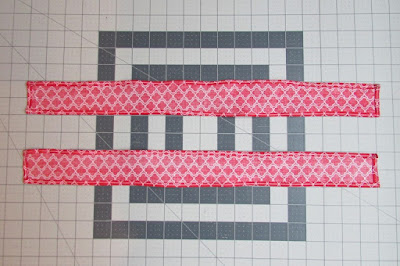
After you have your pieces cut, you should have a pile like in the photo above. Now we're ready to get started sewing!
Construction:
Take two of your ruffle pieces and match up two of their short ends, with right sides together. Sew them together using a 3/8" seam allowance, as shown in yellow above.
Use the same method to attach the remaining ruffle pieces to each other, with all four ruffle pieces end to end, forming on long strip.
Now on that long ruffle strip you will hem the two short ends and the one long edge using a rolled hem. (Leave the second long edge raw.) I recommend using a narrow rolled hem on a sewing machine rather than on a serger. To do this the quick way, you can fold 1/4" to the wrong side and sew down the center of the fold as you go, all along the length you are hemming. Then again fold 1/4" more and sew down the center of the fold as you go. When you're done, you will have a 1/4" folded hem.
(If you prefer, you can take a little longer to iron 1/4" and iron another 1/4" before sewing. I like the quick method.) The photo below shows what one end of your ruffle strip should look like when you're done.
Set the ruffle aside for now. Now you will make similar narrow folded hems on the following pieces. Be SURE to read the instruction for each photo below, because not all pieces are hemmed on the same sides! Don't be frustrated if this takes awhile. It is the only time consuming part of the apron!
Take the Sash Center and make a narrow hem on the two long sides only.
(Leave the two short ends raw.)
Take the two Sash Tie pieces and make a narrow hem on two long sides and one long end only. (Leave one short end raw.)
Take the two Neck Tie pieces and make a narrow hem on all four sides.
You're almost done with the narrow hems! Now make a narrow hem on the two upper curves of the big apron piece.
Finally, make a narrow hem on the very top edge of the apron. It should look like the photo above.
You're all done with narrow hems, whew!
Take the Sash Center piece and line it up with the top of the wide portion of the apron, matching the corners, as shown above. Pin it in place, then check to make sure it goes straight across.
Sew the sash center to the apron by sewing directly on the existing stitch lines.
After sewing, trim the ends of the sash center so it follows the curves of the apron underneath.
You are now ready to gather the ruffle! Set your stitch length as long as it will go and adjust your tension as high as it will go. Without back-stitching, sew across the long raw edge of the ruffle 1/4" from the edge. The ruffle should gather slightly as you sew. When you get to the end, do not back-stitch! Use the two threads to gather the ruffle by sliding the fabric inward. Slide it carefully so your thread won't break! (Some seamstresses use two rows of gathering stitches. I use only one row and don't have a problem because I'm careful. Your choice.)
Continue gathering your ruffle until it is about the same length as the outer raw curve of your apron, as shown above.
Flip the ruffle up and pin it to the raw edge with right sides together, adjusting the gathers as you go. Make sure the ends of the ruffle line up with the upper edge of the center sash on each side. See photo. I use lots of pins to hold the ruffles in place. The more pins you use, the more even your ruffles will be.
With the ruffle pinned in place, sew along the pinned edge using a 3/8" seam allowance, securing the ruffle in place. Go slowly and make sure the ruffles lay nicely as you sew over them.
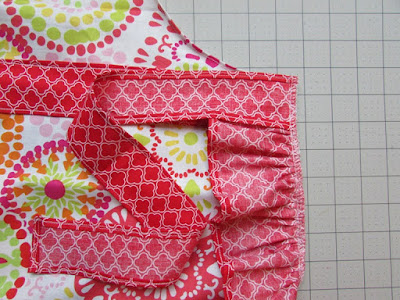
With the ruffle still folded inward, take your Sash Ties and pin one to each end of the sash center, with right sides together. Note that the ruffles are sandwiched between the sash ties and the sash center. Check to make sure your pinned ties look exactly like the photo above, with right sides of ties together with right side of sash center.
Sew the sash ties in place on each end, using a 3/8" allowance.
Now you will finish the raw edges of the seams you just made, by serging or using a zigzag stitch all around the raw curved edges of the apron. See photo above.
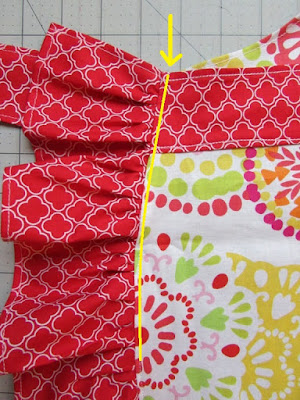
Flip the ruffle and sash ties out so you see only the right sides. It should look something like the photo above. Now you will top stitch the ruffle seam in place by sewing on the apron edge 1/8" in from the ruffle seam. See the yellow line in the photo. As you topstitching, be sure you are catching the seam underneath. This give a really professional finish to your apron and also helps the ruffle flare out and stay crisp and tidy.
Take the Neck ties and pin one to each upper corner of the apron, matching up the narrow hems, as shown above. The neck ties will be pinned on the wrong side of the fabric.
On the front side of the apron, sew two lines across each of the narrow hems, as shown in yellow above. This should secure the neck ties in place.
Check the back of the apron to make sure the ties were sewn in place. If they're not sturdy, sew another line or two from the right side to secure them.
You are now done with your apron! Go ahead and sew the matching one if you did not already do so.
Well, what do you think? Aren't they even prettier in person? The narrow hems can take awhile, but you will find they get much faster as you go. I think I could make these in my sleep now.
As you finish, please be sure to show us your matching aprons in our Patterns Group on Facebook! We love to see what you make.
Let's Create ~ Kristen


